
Citroën CX - Fuel Injection Plastic Plenum Repair
CX Intake Plenum Failure Is Disabling
The plastic CX intake plenum commonly fails. Failure is sudden and reduces engine power drastically, so much that the engine barely runs. Owners should be aware and take pre-emptive action to avoid being stranded. Of course the best solution is to find an early aluminium plenum which will never fail, or even a Turbo plenum (which is also aluminium). However, the aluminium plenum is not a direct fit, some work is required to make it work with cars not originally fit with them.
Brace the Plenum
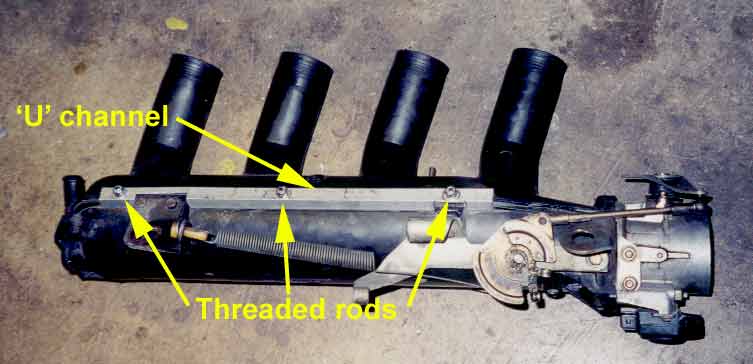
The solution is inexpensive and doesn't require advanced mechanical skills. Brace the plenum using three threaded rods inserted through a pair of U shaped aluminium channels. This bracing keeps the plenum from spreading at the original seam, thus preventing the outer wall from collapsing.
The repair shown here was performed in 2009 on a 1987 CX Safari and still works today. The plenum was repaired after it failed, luckily failing in the garage. Credit for this solution goes to Ariel D. Robinson, well known in Citroën circles in the mid-Atlantic United States.
Disclaimer: The writer and his associates bear no responsibility for the success or failure of this repair. Proceed at your own risk.
The Fix:
The fix is to strengthen the seam and force the plenum to maintain its shape. You need the materials listed below:
- 1/2" (12.5mm) 'U' channel aluminium of sufficient length to run the length of the plenum top and bottom (about 30")
- A 1/8" (3mm) threaded rod about 24" long
- 6 self-locking nuts for the threaded rod with flat washers
You need the following tools
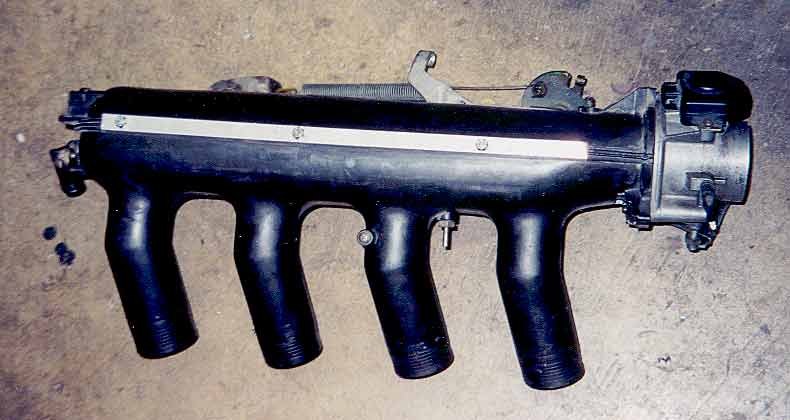
Overall view of a repaired plenum.
- Hack saw
- Dremel tool or similar cutting tool
- High speed drill
- Drill bits of the proper size
- Drill punch
- Wrench for the nuts
- Long-nose pliers
- A large bench mounted vise (6" vise suggested)
- Measuring tape
As the photos show, the aim is to brace the top and bottom seams with the 'U' channel using three rods evenly spaced over the length of the channels. If the seam can't expand outward there isn't room for the side to 'implode'. To see the effect of the repair press on the side with both thumbs and note the amount of deflection (you may have to press very hard). Try this again after the repair, you shouldn't see any deflection with the same pressure.
The trick is to be able to drill the holes from each side so they line up. This requires careful measuring. Measure twice, drill once! The drill bit should be exactly the same size as the rod, so the plastic plenum will self seal around the rod.
Clamp the plenum, with the 'U' channel installed, in a large vise (remove the throttle housing for better access and visibility). The 'U' channel is a tight fit at 1/2", but it does fit. You must cut two small sections from the 'U' channel to fit it over the 'gussets' on the bottom of the plenum (see photos). Align the U-channel to mark for these cuts, cut and fit the channel as shown.
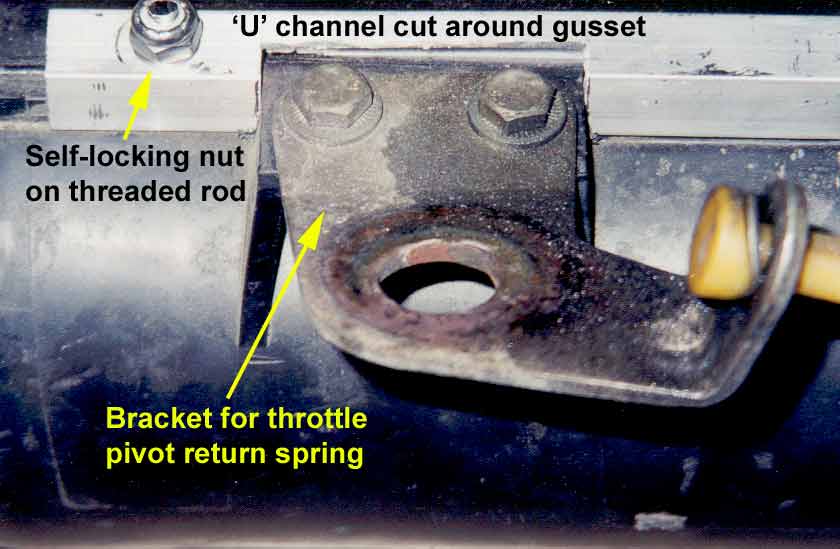 |
Detail view of plenum at spring clip end. |
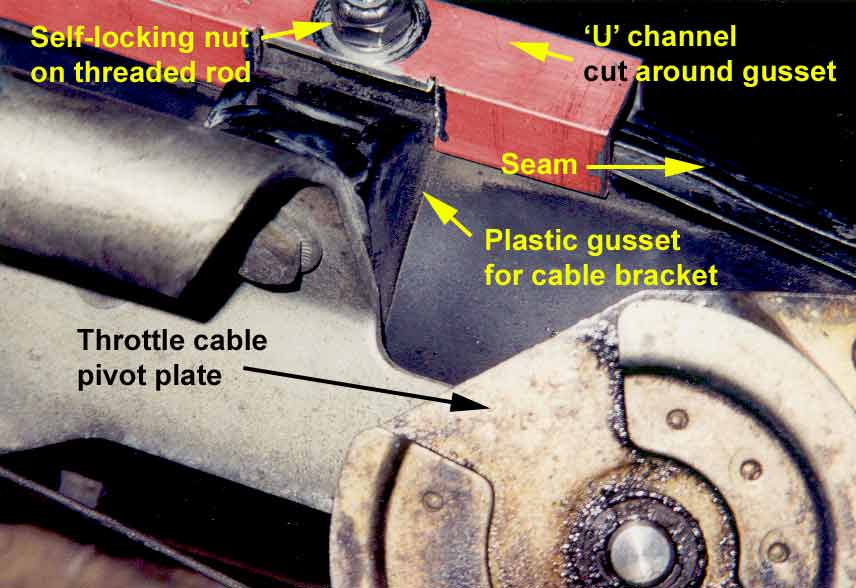 |
Detail view of plenum at the throttle plate end. The "U" channel is digitally tinted red for clarity. |
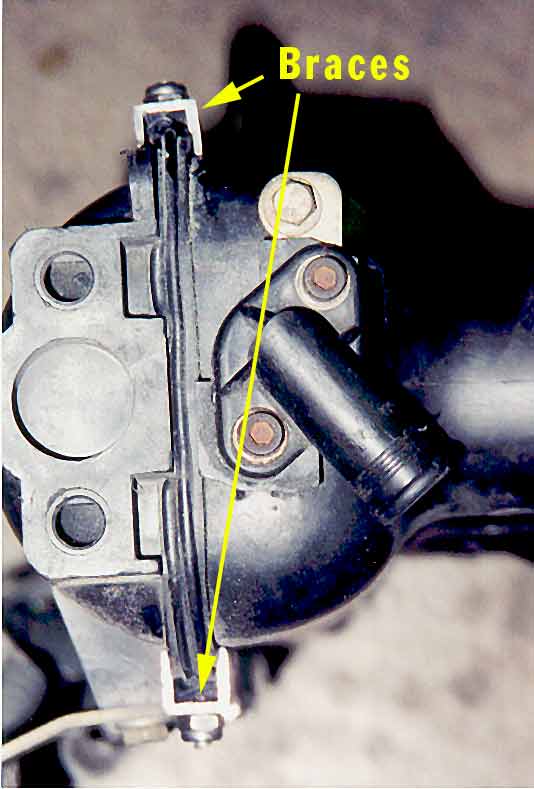 |
View of the plenum from the end showing the bracing. The braces prevent the seams from spreading apart. Since they can't move outward the curved side away from the engine cannot be sucked in, thus the plenum cannot collapse. Problem solved! |
With the plenum and U-channel clamped in a vise, drill a pair of holes through the 'U' channel and the plenum, for perfect alignment, from each side. Here you MUST measure accurately so the rod is straight, the holes must line up! Then insert the threaded rod (not yet cut) into one hole and through the opposite hole. This requires a bit of luck and some planning of the hole locations. Study the 'overall' photos for a good idea of where the holes should go. You may also find it helpful to use a small tool, such as an awl or similar sharp instrument inserted through the second hole. Push the awl or other pointed tool against the end of the rod inside the plenum to help guide the rod through the second hole. This may be the most frustrating part of this task, so be patient and persevere.
Once the rod is through the second hole put a washer and self-locking nut on the rod and tigthen until the rod is just flush with the top of the nut. Now pull the rod back through and cut it with enough length left to handle it with pliers. Put the second washer and self-locking nut on that end and tighten. You should have a bit of rod to grip so you can get the nut on without the rod simply turning in place. The fit of the rod should be tight enough where it passes through the plenum to assist in holding the rod.
Repeat the process two more times. As you tighten the nuts on the rods don't distort the plenum, look at the 'U' channel and make sure it remains straight. When all three rods are inserted use a dremel tool to cut the rod flush with the top of the nut (don't cut the nut). That's it, you are ready to put the plenum back on the engine!
Overall view of the repaired plenum showing the bottom.